Table of Contents
VIDEO SCREEN RECORDING: WHAT, HOW, WHY?
Video screen recording is perhaps one of the most useful methods for knowledge-sharing; with multiple applications across countless fields of work. Videos can grab a user’s attention and convey information effectively. It is most commonly used by software developers, students, educators, and digital creators. This process consists of three components; text, audio, and video. Read to know how to make screen recording for knowledge sharing with Wondershare DemoCreator.
WHAT IS WONDERSHARE DEMOCREATOR?
Wondershare DemoCreator is a downloadable software offering you all the necessary specifications to efficiently record your screen. You can utilize the available templates of annotations, stickers, captions, transitions, and effects to edit the raw video as per your requirement. DemoCreator screen recorder not only simplifies the otherwise complex process of screencasting but also goes on to enhance your overall editing experience and make your final product stand out, due to the diverse range of functions that come with the software.
WHO NEEDS DEMOCREATOR?
DemoCreator is useful for several purposes; it can be used by teachers, professors, and educators to integrate technology into the curriculum, it assists students who wish to properly record video and audio and properly demonstrate the appropriate procedure to solve an academic problem on an interactive whiteboard, it may be used by software designers to find bugs in programs as well demonstrate how a particular program works or for ones to record tutorial videos– the applications are endless!
HOW DO I RECORD A SCREENCAST?
To begin recording a screencast, head over to DemoCreator official website and download the Wondershare DemoCreator setup for free. Install the software and then follow these simple steps.
-Writing a storyboard and script for your video is very important. A storyboard will loosely define the sequence of events in your video and a script is an outline of the dialogue or tasks you deliver. These will give a proper structure and sequence to your video.
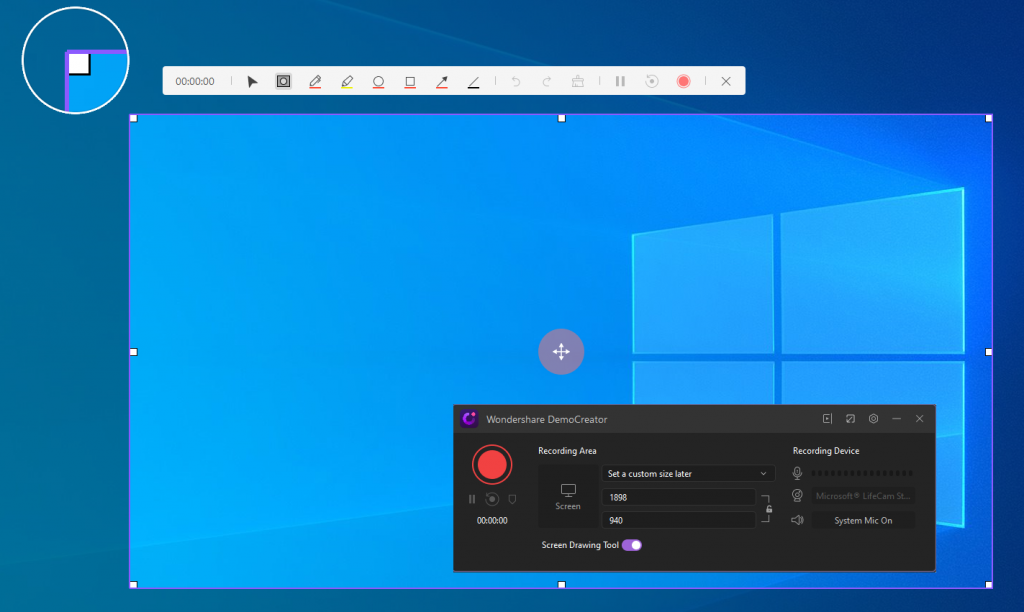
– Open the program and click the ‘New Recording’ button to start recording.

– After the pop-up window appears on your screen, adjust the border to readjust the size of the region you want to record; this will enable you to make precise adjustments using the magnifier.
– Click and drag the plus icon in the top left corner of the border to reposition your recording region; you can simply switch back to recording the full screen by pressing the Shift+F keys.

– Find the audio and webcam icons on the right side of the window; if you want to capture your screen with a webcam and sound, click the icon to enable it. Make sure your microphone and webcam are well connected to your computer!

– Drag the audio slider to increase or decrease the sound volume.
– When you’re all ready to go, either click the “start capturing” icon (the red button) or press the F10 key to start recording.
– After starting the recording, DemoCreator will count down 3 seconds before recording your screen.

– If you want to pause the recording, click the Pause icon or press the F9 key; you can resume the recording by pressing the F9 key again.
– Press the F10 key to stop recording.
– The recording will be saved to a specific location and can be opened in the editor interface.
HOW DO I EDIT MY VIDEO?
Once you end a screen recording in the Wondershare DemoCreator, the video editing window is opened automatically.
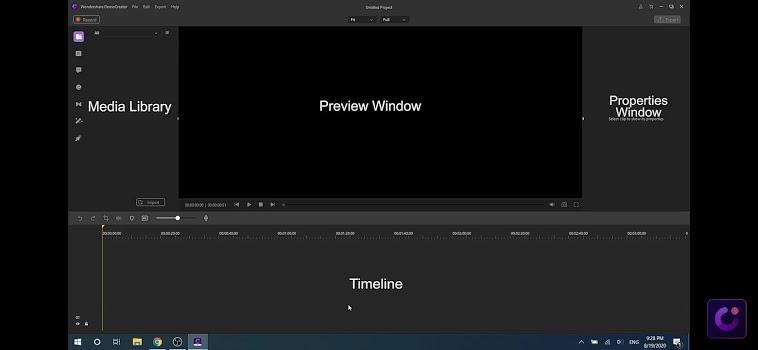
– You can see four main operating areas in the video editor interface; the media library (left side), the preview window (top center), properties window (right side), and timeline (bottom center).

– In the media library, you can import files, add files, annotations, stickers, transitions, montage, cursor effects, and preview the clips. Your recording is automatically added to the media library.
– Then, you can drag your clips to the timeline to begin editing.
– Once the video clip is in your timeline, you can mute it or detach the audio for separate editing. This can be done by right-clicking on the clip and choosing either option. Detached audio is placed in the timeline as a separate file which can be edited individually.

– At the bottom of the preview window, some functional icons have been placed; in addition to the basic forward, backward, play, stop buttons as well as the volume adjustment, you can also record a voiceover or take a snapshot.
– Use voiceover to record; click “voiceover” in the toolbar. You can play your video back while you create this audio recording; however, before recording audio, properly connect your recording device to your computer.

– You can click “snapshot” to take a still image of a video frame.
– In the preview window, drag the white dot to adjust the scale of the clip; you can do this at the properties window, such as transform, compositing, and speed.
– In addition to editing captured video files, you can also edit your own video files here, such as volume adjustment, denoise, speed, or duration setting.
– Use these advanced tools to create the perfect video!
HOW DO I PREPARE FOR WEBCAM RECORDING?
– To add a picture in picture display to your PPT contact recording, connect your webcam to your computer.
– Enable the webcam at the capture option.

– The webcam media files will automatically save and be displayed in the media library.
– Drag it directly to the timeline window and resize it accordingly to make a PIP video.

HOW DO I IMPORT OR EXPORT MY VIDEO?
(IMPORT METHOD) # 1
– Open the interface.
– Click “File” on the top left toolbar.
– Click on “import media files” and “import media folder” from the submenu; choose whichever one you want.

(IMPORT METHOD) # 2
– You can also left-click on “import” in the media library panel.
– Choose the media files to upload.

(EXPORT METHOD)
– Click on either of the “Export” buttons which are present on both the upper left corner and upper right corner of the interface.

– Save the edited video.
– Select the desired format, coder, framerate, resolution, and other settings.

– Share online immediately or save offline.


