
Do you believe tying the perfect bow is an art? Yes, of course, it is because when you tie a bow, you need to ensure that it is symmetrical, eye-catching, satisfying, and carefully wrapped in the gifts or anything else. Sometimes, bows are the most important things that enhance the beauty of the gifts and make the packages fancier. You might be preparing for wedding gifts or special events gifts, but learning how to tie the perfect bow is crucial to make the person happy with the gift.
Table of Contents
How To Tie The Perfect Bow: Change the presentation of the Gift:
You can follow certain ways to tie the perfect Bow, and with a perfect bow, you can change the look of your gift wrap. Let’s quickly list the ways and see how you can do it in detail.
- Tie Basic Bow
- Tie Looped Bow
- Tie A Floral Bow
1. Basic Bow:
It is the very easy type, and you can begin with a strong or knotted ribbon. Tying the basic bow perfectly is the same for all types of strings and ribbons. So, you can use it for anything to beautify. In this technique, you need one ribbon, and both ends will stem the same from the knotted center.
Consider The Following Points:
You need to loop the string under the Bow. Get both ends on the top and make a knot by keeping the ends equally in length. After that, there are two ends to work on. Make a knot at the center.
Take the left side and make its loop and hold it. If it is a ribbon, not a string, you must ensure it’s untwisted.
Now it’s time for the second loop with the right end. This loop comes under the first loop. Make both loops of the same size.
When both the loops are ready, you need to tighten them by tightening the knot at the center, but don’t make any end loose that causes variation in the sizes of the loops.
2. Looped Bow:
Here, we will discuss how to tie the perfect bow when you want to tie a Looped Bow. Remember that the looped bow always starts with a long piece of ribbon. The following points will be helpful to you.
- Take foot long piece of ribbon or string, whatever you prefer. Remember, it should be exact 12 inches for the perfect Bow. Make it straight, and remember to keep it untwisted and unknotted.
- The first left loop comes at the first end of your bow. Don’t forget that dimensions are crucial in the looped Bow. You can start the loop from the three inches of the Bow. Now, hold the loop with your forefinger.
- Also, loop from the right end, but this time, ensure that the ribbon or string looks opposite to the letter “S.” It also has to have a tail at an end.
- Keep the loops held, so they don’t get undone, and also continue creating new loops until you find the ends and style the ends, but ensure that both ends end at the same length.
- You can use one florist wire, but a thin string is also okay to tie your loops together and make a knot at the center by dividing it into two.
- At last, you need to fluff the loops because they’re unevenly distributed from the center. It begins with separating loops and making the center invisible. You can use scissors to tie the ends to make an inverted V.
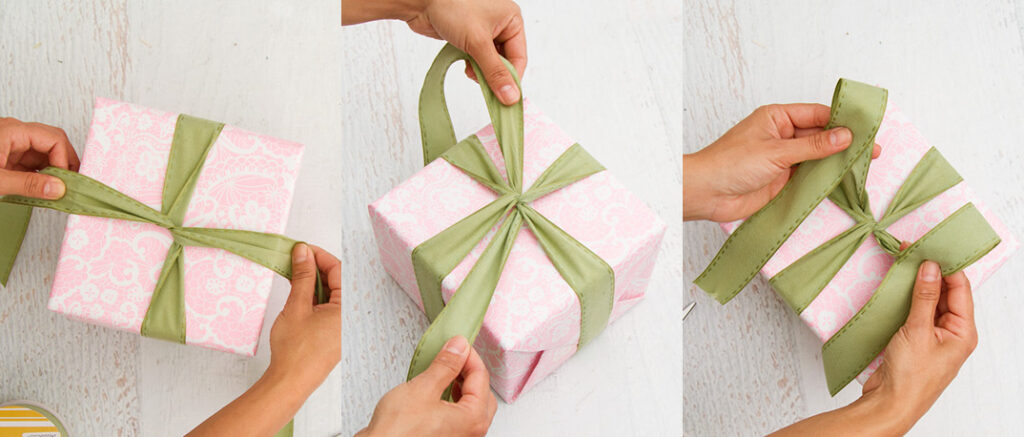
3. A Floral Bow:
Do you know how to tie the perfect Bow if you want to tie a floral bow? Let’s discuss this in the following points. You can follow these steps to tie a perfect floral bow.
Take a foot of string or ribbon and wrap it around your hand. Hold both ends around your palm. You can do it with your thumb. Keep wrapping the ribbon or string and finish it. The most important consideration here is ensuring that each loop you make around your palm has to be on the previous loop perfectly.
Take it off and hold half in your hand, but don’t let the loops unfold or slip off.
Cut it from the ends and keep the center held by holding the loops so that you can target the center part of the folded loops. A scissor will help you cut it.
Once all the layers or loops are cut, you can use them carefully on the box. Beware of not letting it slip off or unfold because it will vanish your efforts.
You must ensure that you don’t cut two corners too close to the center of the ribbon.
If you are successful in these steps, now it’s time to use another piece of ribbon or string of the same material, type, and color. It is used to tie the cinch. You should use this ribbon between the notches made in the loops to tie a knot. It is also better to use florist wire or a small string.
At Last To Form Petal:
If you have followed all the steps of floral Bow, now it’s the last thing to consider. You need to separate all loops from the inside and outside. Be gentle while pulling off the loops and slightly twist them towards you. You need to arrange the loops to form one petal. It is a circular pattern. Once you do it, your floral Bow is ready for the gift.
Making Bow using A Thin Ribbon
You don’t need to worry about using a thin ribbon or a string. You can do it better with this too! Of course, most ribbons are from 5mm to an inch in thickness, which makes the knot-making process easier and faster, but if you have accessed the thin ribbon or string, you should do it the same way we have. All types of ribbons and strings of different sizes are okay with these three methods discussed in this article.
-
Curling Your Ribbon:
Don’t you know how to curl a ribbon? If you use a curling balloon or a simple balloon, hold your thick or thin ribbon against the scissor blade. Use your thumb to hold it. Now it’s time to pull the ribbon from the blade. It will make curls on the ribbon, and it will make the loops automatically that are tiny and smooth.
If you are using a wired or a floral ribbon, you should use a dowel and slide out the dowel to make the curls. That’s the easiest way to bring curls on the dowel.
-
Don’t Use Too Many ribbons:
Once you learn how to tie the perfect Bow, you can make it, but how will you attach it to the wrapped box? Of course, most people use tape, but most use too many tapes, making them poor quality and dirty. Don’t make it like this after making good efforts to make your Bow look cool and beautiful. You should avoid using too many tapes. One to two small pieces of tape are okay but don’t use them if you want to hide the tape completely. Instead, use glue that comes in a bottle that will dry out, making things clear.
Tips To Tie The Perfect Bow:
We have discussed three ways to tell you how to tie the perfect Bow, but there are tips you can follow to make the procedure easier, gift-wrapped, look cool, and enhance the beauty of your wrapping. Here are the tips you should follow.
- Always remember to keep both ends of the ribbon or string left equally in length, but one longer end also looks cool. However, it only suits large gifts and ribbons. So, leave both ends of equal length.
- If you have left one end long, don’t rush because it’s easy to readjust the Bow you made, and you can quickly fix the excess ribbon from one end. Of course, cut it off.
- If you don’t want to cut off the ribbon, you might need to readjust the whole thing. So, it’s better to use scissors at the end.
Wrapping Up:
Wasn’t it easy to learn how to tie the perfect Bow? With these three ways discussed in this article, you don’t need to look back and think about how to gift wrap for weddings and special events. You can simply buy the gifts, use attractive and shiny paper to wrap them like a pro, and use thick or thin ribbon or string to tie a bow. After doing this little thing, you don’t have to visit gift galleries to gift wrap your presents for others.


